


Avoid These 5 CGI Mistakes and Improve Your Renders
Learn how to fix common pitfalls in 3D visualisation for more realistic, professional-quality results.

Hi,
In today’s newsletter, we’ll take a closer look at the most common mistakes in CGI and how you can fix them to create more realistic and professional-quality renders. From refining your base geometry to mastering lighting and post-processing, these essential steps will significantly improve your work.
In today’s edition, we’ll cover:
⇨ Refining Your 3D Geometry
⇨ Bringing your textures to life
⇨ Mastering lighting to create depth and realism
⇨ Perfecting your camera work and composition
⇨ Enhancing your renders with effective post-processing
Let’s explore how these strategies can transform your CGI work and improve the realism of your renders.
A quick word from our sponsor:
This week’s edition of the Architectural Visualisation Insider is bought to you by :


Resolution Studios specialise in transforming architectural and interior design concepts into photo-realistic 3D visualisations and animations, helping architects and interior designers effectively showcase their projects.
If you're looking to enhance your design presentations, consider exploring their 3D services - www.resolution-studios.co.uk

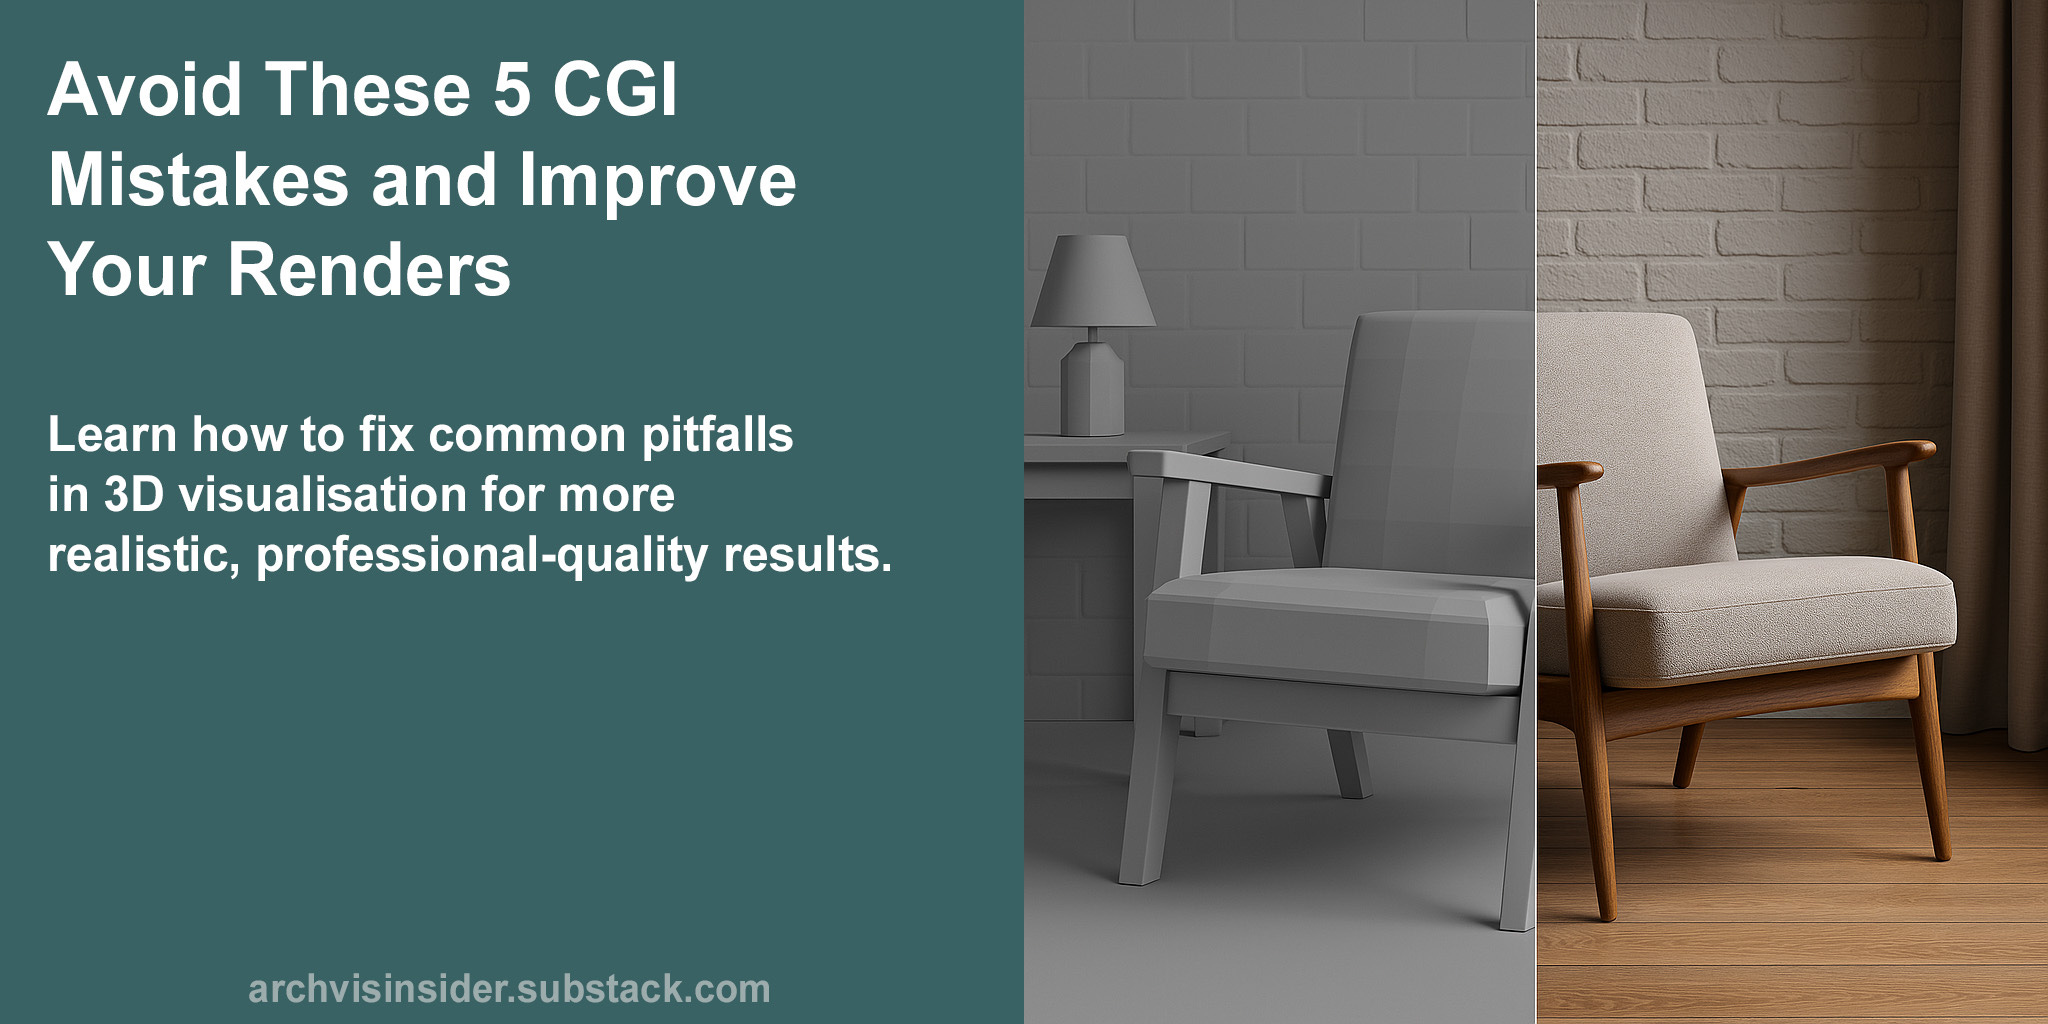
Why Refining Your 3D Geometry Early Leads to Better Results
Great CGI starts with great geometry, but too often, artists rush the modelling phase, leading to blocky, unrealistic results. Understanding the difference between basic and refined geometry can transform the quality of your final renders.
Your model is only as good as its foundation.
If your base geometry is too simple, with visible sharp edges and blocky forms, it will stick out in the final render. This mistake makes your work look unpolished, even with high-quality textures and lighting. Ignoring this early step means more work later when fixing errors, distortions, and unrealistic surfaces.
The result? A model that feels flat, artificial, and hard to integrate into a realistic scene.
Investing in better base geometry pays off in every step of the pipeline.
Smoothing out sharp edges and adding subtle curvature helps light interact more naturally with your surfaces. Even if your model won’t be viewed up close, adding detail in key areas enhances realism without unnecessary performance costs. Professional-grade renders consistently feature clean geometry and well-crafted models, avoiding the outdated, blocky look of early 3D graphics. Well-crafted geometry reduces the need for post-production fixes, keeping everything cleaner and more efficient. By refining early, you ensure fewer errors, better reflections, and a more believable final render.
Don’t let laziness in modelling hold you back, small improvements now make a massive difference later.
Starting with blocky, primitive geometry results in an artificial, unrealistic final render. Investing in high-poly modelling and smoothing sharp edges early ensures a more natural, professional-quality result with fewer fixes down the line.
Fixing Flat Textures: Bring Your Renders to Life
Realistic textures can make or break a CGI render. Yet, one of the most common pitfalls is using lifeless materials that fail to interact with light naturally.
Your textures look flat.
Many CGI renders suffer from basic, uniform textures that lack depth. Without proper detailing, materials can appear dull and dead, pulling viewers out of the scene. This happens because the real world is full of imperfections, subtle roughness, reflections, and variations that standard textures fail to capture. If your materials look more like a painted finish rather than realistic surface, this is why.
A lifeless texture will always feel artificial, no matter how good the model is.
Look at the textures and surfaces around you, how do they interact with light?
In the real world, no surface is perfectly smooth or uniform. Wood has grain, metal catches highlights at different angles, and fabrics scatter light in complex ways. High-quality renders replicate these natural properties through roughness maps, reflection layers, and proper material setup. The key is to observe how light interacts with surfaces and recreate that within your 3D software. When you break down materials into their physical components, diffuse, specular, bump, and displacement, you unlock a new level of realism.
With the right techniques, your textures will no longer just look real, they will feel real.
Flat textures are a dead giveaway of low-quality CGI. To fix this, study real-world materials, understand how they respond to light, and apply detailed texture maps to your 3D model to bring them to life.
Fixing Bad Lighting: Make Your CGI Shine
Lighting can make or break a CGI scene. Poor lighting setup often leads to flat, unrealistic renders that fail to capture the right mood or depth.
Lighting is often added without considering its impact.
This leads to harsh shadows, overexposure, or an unnatural look. Without a strategic approach, your scene can feel lifeless and artificial. A well-lit scene enhances realism and directs the viewer’s focus.
Your lighting choices should be intentional, mimicking how light behaves in the real world.
Think about the sun’s angle and time of day.
Golden hour adds warmth and depth, while midday light creates stronger contrasts. For interiors, carefully place lights to mimic real-world illumination. Consider the type of bulbs used and their colour temperature, warm, cool, or neutral. Lighting isn’t just about brightness; it shapes the scene’s atmosphere. A well-planned setup creates depth, realism, and visual appeal.
Mastering light placement transforms an average render into a stunning, believable scene.
Poor lighting choices can ruin an otherwise great render. By considering natural light angles and interior lighting types, you can achieve more realistic, visually compelling CGIs.
Fixing Camera Work: Elevate Your 3D Renders
Camera work is often overlooked in CGI, but it plays a vital role in the overall quality of your renders. By addressing common mistakes in camera placement and composition, you can take your work to the next level.
Camera work isn’t as simple as “drop and go.”
It’s an intentional process that can make or break your render. A poorly chosen angle can flatten your entire scene, making it feel lifeless. You must take time to thoughtfully place your camera.
This is especially crucial for making your models feel dynamic and real.
Consider the best angle to showcase your model’s key features.
Think about composition: foreground, background, and everything in between. A compelling composition draws the viewer’s eye and creates depth. Playing with framing and depth can add mood and emotion to your renders. I’m emphasising this because, without intentional camera work, even the most detailed models can look flat. Taking time to refine your camera placement and composition leads to more engaging and dynamic visuals.
By mastering camera angles and composition, you will breathe life into your CGI work.
Refining your camera work is essential for creating compelling 3D visuals. By considering composition and camera angles, you can significantly elevate the impact of your renders.
Fixing Ineffective Post-Processing: Elevate Your CGI Renders
Post-processing is where your renders can either come alive or fall flat. Effective post-processing can transform a good render into a great one.
One of the most common CGI mistakes is ineffective post-processing right after the render.
Poor post-processing leaves renders looking lifeless, with flat lighting and unrefined details. Without proper post-processing, the final image loses its potential to communicate depth and realism. This issue often stems from an over-reliance on raw renders, missing the opportunity for enhancement.
To bring your renders to life, post-processing should be seen as the finishing touch, not an afterthought.
The aim is not just to add effects, but to lift the image, highlight key areas, and enhance overall lighting. Using tools like colour grading, lighting adjustments, and selective focus can drastically improve visual quality. Amplifying textures and shadows adds depth, while carefully lifting certain areas can guide the viewer’s eye. Understanding these techniques can transform an average render into something visually stunning and impactful. Post-processing isn’t about overcomplicating; it’s about refining the final touches to achieve your intended vision.
By mastering post-processing, you ensure that your renders not only impress, but engage and tell a stronger visual story.
Effective post-processing can elevate your renders from flat to fantastic. By focusing on lighting, textures, and selective enhancements, you can create images that truly stand out.
Great results start with great foundations.
By refining the details early, you’re not just improving your work,
you’re setting yourself up for success.
Summary
To create compelling 3D renders, attention to detail is key. The most common pitfalls geometry, textures, lighting, camera work, and post-processing can significantly impact the realism of your work. By refining these elements early, you’ll ensure smoother workflows and more professional results.
Improving geometry from the start helps prevent later corrections, while realistic textures and well-planned lighting add depth and life to your renders. Thoughtful camera placement and effective post-processing further elevate the overall quality. Each step is essential for creating images that truly stand out and captivate your audience.
Remember, small adjustments, lead to big improvements in the final result.
I hope you’ve enjoyed this weeks edition of the Architectural Visualisation Insider, if so please let me know in the comments or give it a like, and if you haven’t already done so, please subscribe to be notified of future editions.
Speak soon,
Jamie
P.S. We’re hosting a free webinar, ‘An Introduction to Architectural Visualisation’ over the next few weeks.
Please check the link to find out more information and what will be covered and select your preferred time and dates.
We look forward to seeing you there.